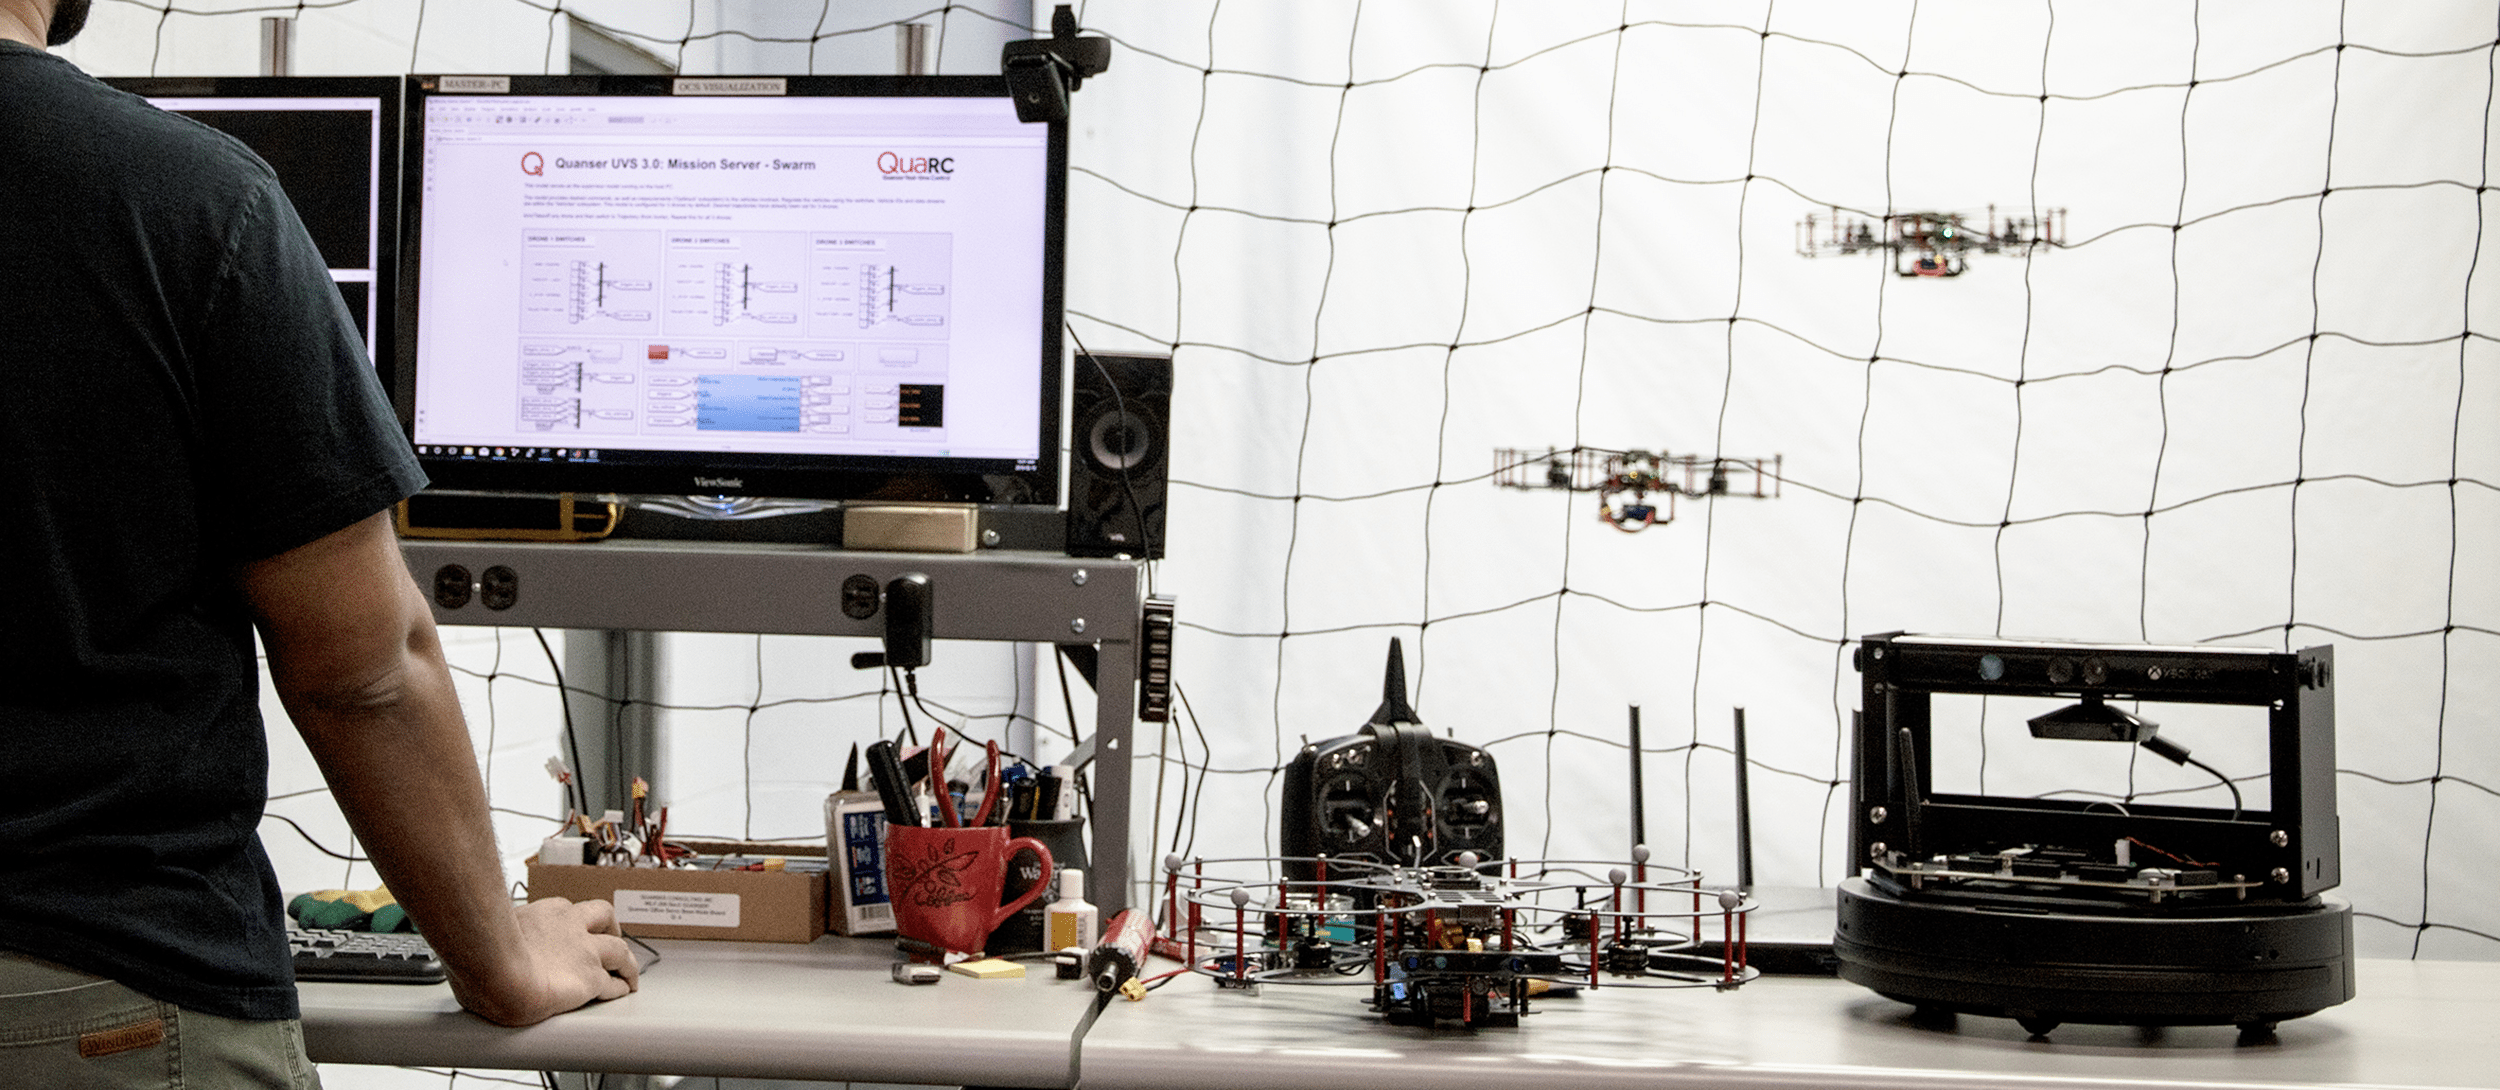

For the past year, I’ve been developing the software and control architecture for drones as an Unmanned Systems Engineer at Quanser. When I started, I only had one concept down right – the mapping between the motors and the degrees of freedom they controlled. To get a better sense of the drone’s flight dynamics, a senior engineer asked me first to try and fly a drone manually. In under 5 minutes, I realized that it is a lot more complicated than you’d have thought! I signed up to manipulate a very dynamic drone with an untamed coupling between my shaky hands and eyes that didn’t know what to look for.
Tweaking the controllers over the next couple of months, I conveyed the expected behavior to a colleague – our pilot. I struggled with trying to relate his expert advice to what I was doing to the code because it came through as ‘too much gain’ or ‘not responsive enough.’ Eventually, we got better at both our lingo as well as the art of flying drones, and this is a short story related to the latter. I had two simple goals – one, make it easier for myself to fly a drone, and by extension, two, for anyone and everyone who wanted to fly drones.
The Build Up…
It all started with a classic control loop. I wanted the system to go somewhere, and I knew I could make it happen by actuating the system with a set of motor commands. However, instead of generating these motor commands myself, I added a controller that wrote the commands. It calculated the commands based on where I wanted the drone to go and where it ended up (referred to as the ‘error signal’). That’s really the high-level gist of it as shown below. Different controllers vary in how they generate the command, but I decided to stick to a Proportional-Integral-Velocity controller (PIV, also shown below). This form of a controller looks at the current error, how it has been accumulating, and how fast the measurement is changing. Look it up!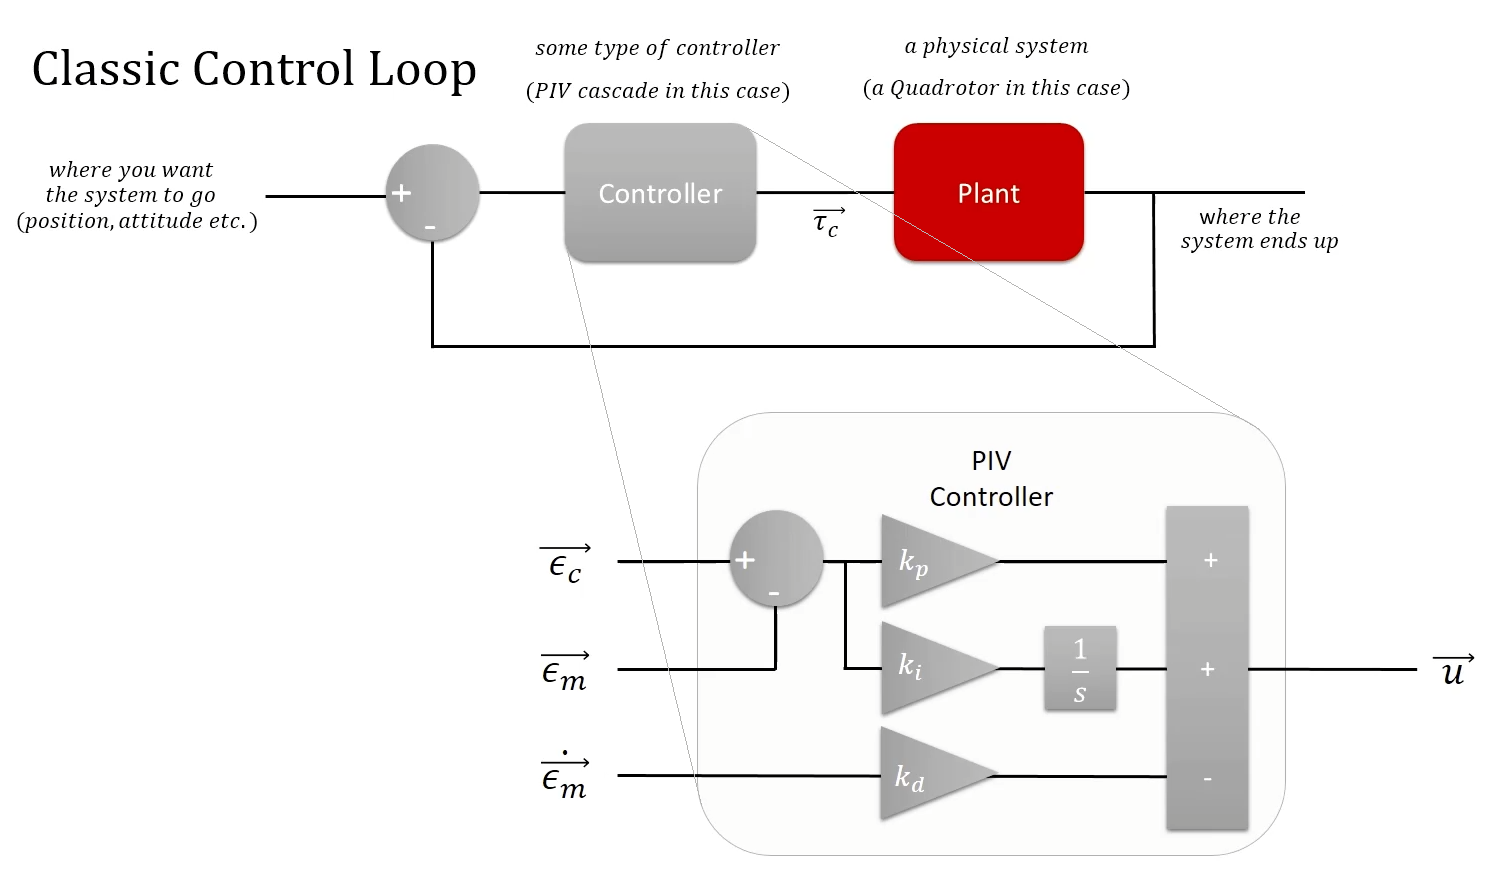
The part where it all made sense…
What’s interesting though, is how you can interpret the output command of a PIV controller as a command for another PIV controller in series. This let me daisy chain three PIVs to control the position, attitude and angular rate of a drone without losing much sleep. You can see it illustrated in the scheme below. When the drone was assigned a position command, the blue PIV generated an attitude (or angle) command for the green PIV, which did the same to create an angular rate command for the gray PIV. The gray one generated a motor command, which actuated the drone. In response, the drone rotated, changing its attitude and reaching the target position, all at a 1000 Hz. Sweet.
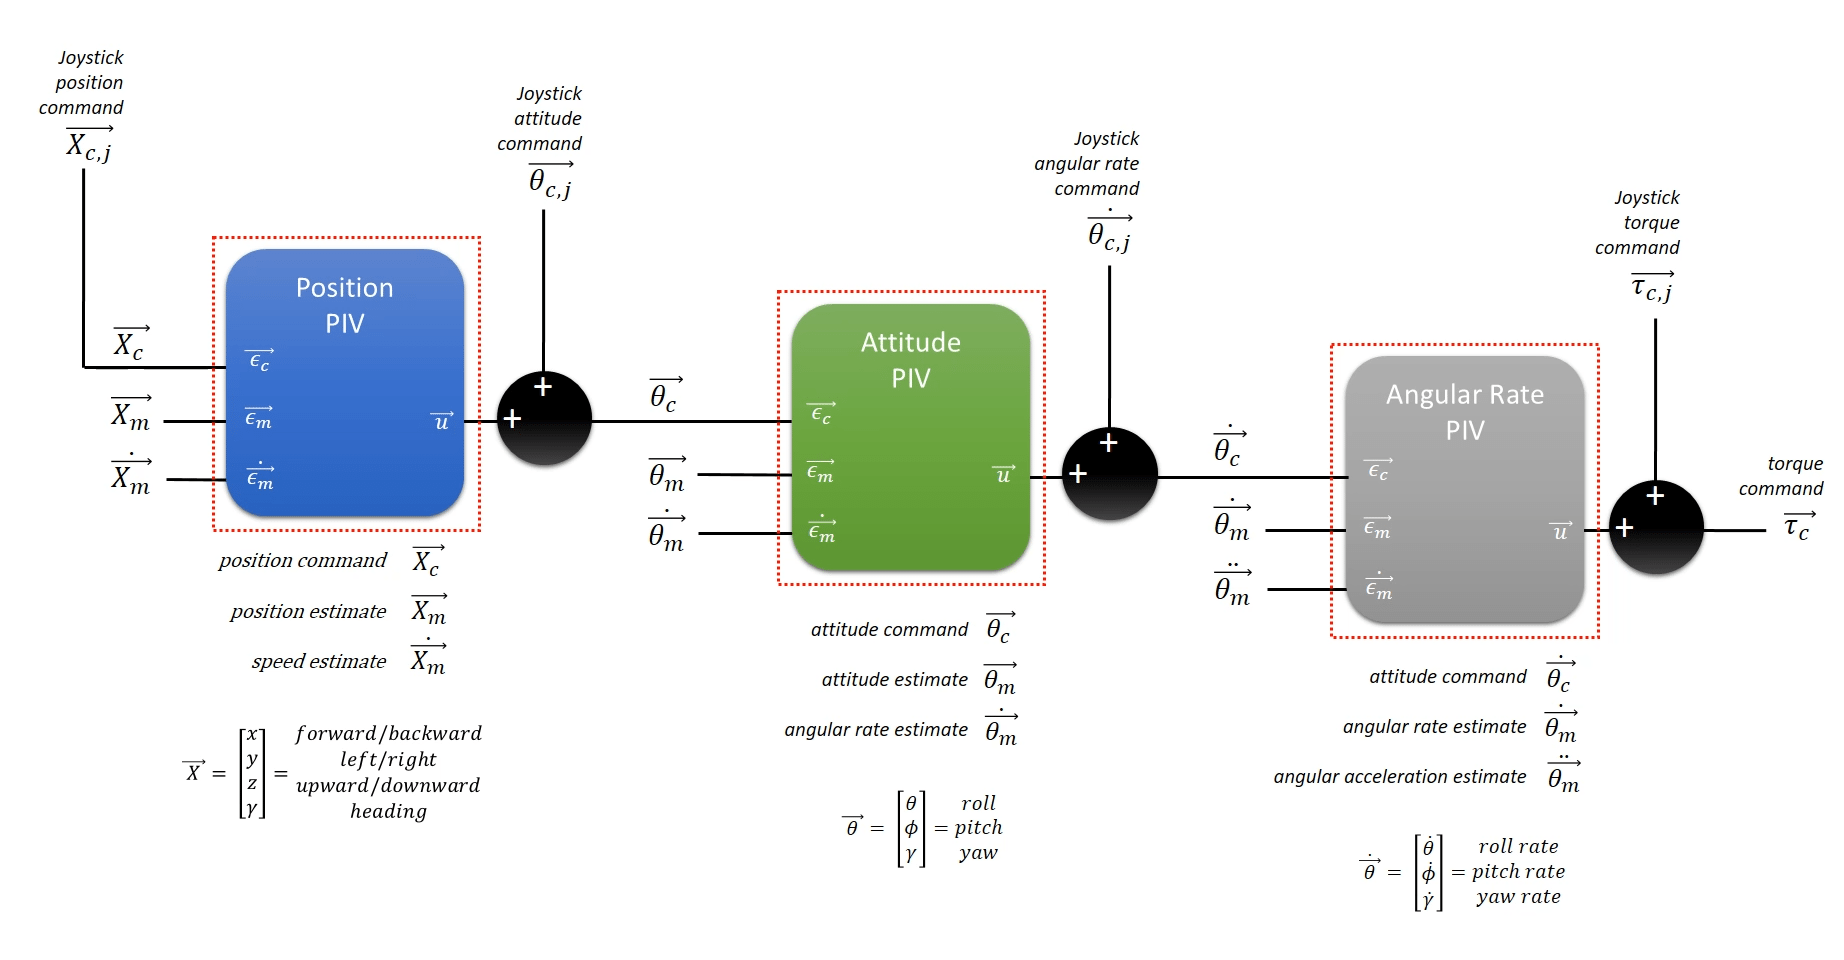
If you look closer, you can see four different places where the joystick lets me insert disturbance commands. When I commanded one of these four, the other three were zeroed out, behaving normally without external disturbances. This way, I was able to fly the drone in any one of four different modes:
1. Position Mode – joystick inputs were a target location
2. Angle Mode – joystick inputs were a target attitude
3. Rate Mode – joystick inputs were a target angular rate
4. Torque Mode – joystick inputs were direct system torques (basically motor commands)
The video clip above shows me flying modes 1, 2 and 4. By the way, no rate mode – you don’t maneuver your car inside your garage by looking at the car’s speed. I didn’t want to fly a drone indoors in rate mode.
The tricky part was mode 4, the raw control technique because you look at the drone, understand what its doing, take actions through the joystick, and then the drone responds – all of which takes place at about 4 Hz. Basically, you can’t fly this way. No no no. Instead, I activated the attitude and rate controllers and disturbed the system with a joystick torque input. This way, when I left the joystick alone, the green and gray boxes in the scheme above still stabilized the drone for me.
A blissful ending
What I find interesting is how my perspective on what’s easy and what’s not has changed. I started off relying on position control, which was easy. I called it the beginner mode but had to rely on a localization system for position estimates. Attitude estimates for angle mode, on the other hand, only required the on-board IMU. I called this angle control flight the intermediate mode. When I flew the drone in the torque setting, I referred to it as an expert mode. Two months of flying the intermediate/expert modes, and I can’t help but feel the exact opposite. I find position mode difficult now because I don’t have as much control as I would like. This isn’t uncommon though, most pilots flying rate mode dislike switching to angle mode for similar reasons. I was convinced that I had now made it easy for myself to fly drones.
But I promised another deliverable too now, didn’t I? I had to provide other people with the same experience and functionality. That’s why you can now find the controllers I developed in the form of functionality modules included with the QDrone in the Autonomous Vehicles Research Studio. The Stabilizer module consists of the attitude and angular rate controllers, and accepts an ‘Attitude (rad)’ command or an ‘Attitude Torque (Nm)’ command, providing both the angle and torque modes. The Commander module accepts ‘Position Commands (m)’ and generates ‘Attitude (rad)’ commands for the stabilizer automatically. You can find detailed information on these functionality modules and their architecture in our whitepaper – Thinking and Talking in Multi-vehicle Research. Now, you all can fly drones easily.
Have fun and let me know how it’s going!